Why Installation Is Everything
Every window company claims to be the best. Salespeople will assure you their installers have decades of experience, and no contractor will ever admit to doing a poor job. But here's a number that tells a different story: roughly 80% of negative reviews in the window industry on the Better Business Bureau are about workmanship and installation — not the product itself.
A great window installed poorly will underperform a mediocre window installed correctly. The window is just the product. Installation is where your investment either thrives or fails. Poor installation compromises everything: thermal performance, durability, water management, noise reduction, and longevity. Most problems homeowners blame on their windows are actually installation problems.
This guide walks you through what professional window installation actually looks like — and more importantly, why so many installations go wrong in the first place. It's written by people who've seen the inside of the industry, for homeowners who want to know what to look for and how to protect themselves.
Why So Many Installations Go Wrong
The Race to the Bottom
The core issue in the window replacement market is price competition. To win your business, companies try to offer the lowest quote. But that money has to come from somewhere. To make up for razor-thin margins, corners get cut during installation: fewer materials, rushed timelines, and crews that are underpaid or overworked.
When installers aren't compensated fairly or are rushing to finish five jobs in a week, they aren't going to point out extra issues that require more time and materials to fix. This creates a "don't ask, don't tell" culture. If they pull out your old window and discover rotted wood inside the frame, an underpaid installer might simply cover it up, set the new window in place, and collect their paycheck. The homeowner is none the wiser — but the structural integrity of their wall is compromised, and the problem will resurface years later as mold, drafts, or water damage.
What It Looks Like From the Inside
This isn't speculation. Our team has worked as installers for multiple companies across Calgary, and the pattern is the same almost everywhere. You show up on your first day, they hand you windows from the warehouse in the morning, and expect you to bring back a signed check by evening. Nobody explains the company's standards. Nobody provides training. If you call the office with a problem, they say "you're an installer, you should know — just solve it." How many screws per side? What shim material to use? Whether to apply membrane? There's no big explanation and no follow-up inspection. The customer ends up playing the role of inspector — and they don't even know it.
No Building Code for Retrofit
New home construction has clear, strict building codes that inspectors enforce. Window replacement is a completely different situation. If you're replacing windows in an older home, you're dealing with decades of history — the house may have shifted, framing might be inconsistent, and the original construction methods from 30 or 50 years ago no longer apply. You have 100-year-old houses built with 2x4s, 2x6s, various materials — every window needs a different approach.
Here's the part most homeowners don't realize: there are no specific building codes that outline exactly how a retrofit window replacement must be handled in every unique scenario. Unlike new construction, where you have open 2x6 walls with no siding and no drywall — just put on Tyvek paper, nail the fin, done in 10 minutes — replacement means safely extracting the existing window and installing a new one while working around layers of existing materials. Every house is custom, every house is different. And even if a bad installation ends up in court, a judge doesn't have clear specs or rules to reference. That means the homeowner unknowingly becomes the quality control inspector — a role they are entirely untrained for. This guide is designed to change that.
Pre-Installation: What Should Happen Before Day One
The best installations don't actually start on installation day. They start before anything is ordered, before crews are scheduled, and before a single measurement is written down. This is where quality installers prove their professionalism.
Proper Measurement Protocols
A professional takes measurements at three points: top, middle, and bottom for width, and left, middle, and right for height. They measure the interior and exterior. They account for finish dimensions versus rough opening dimensions. They photograph the window and surrounding area from multiple angles. They note the direction the window faces, the style of exterior trim, and whether the opening is perfectly square (most aren't).
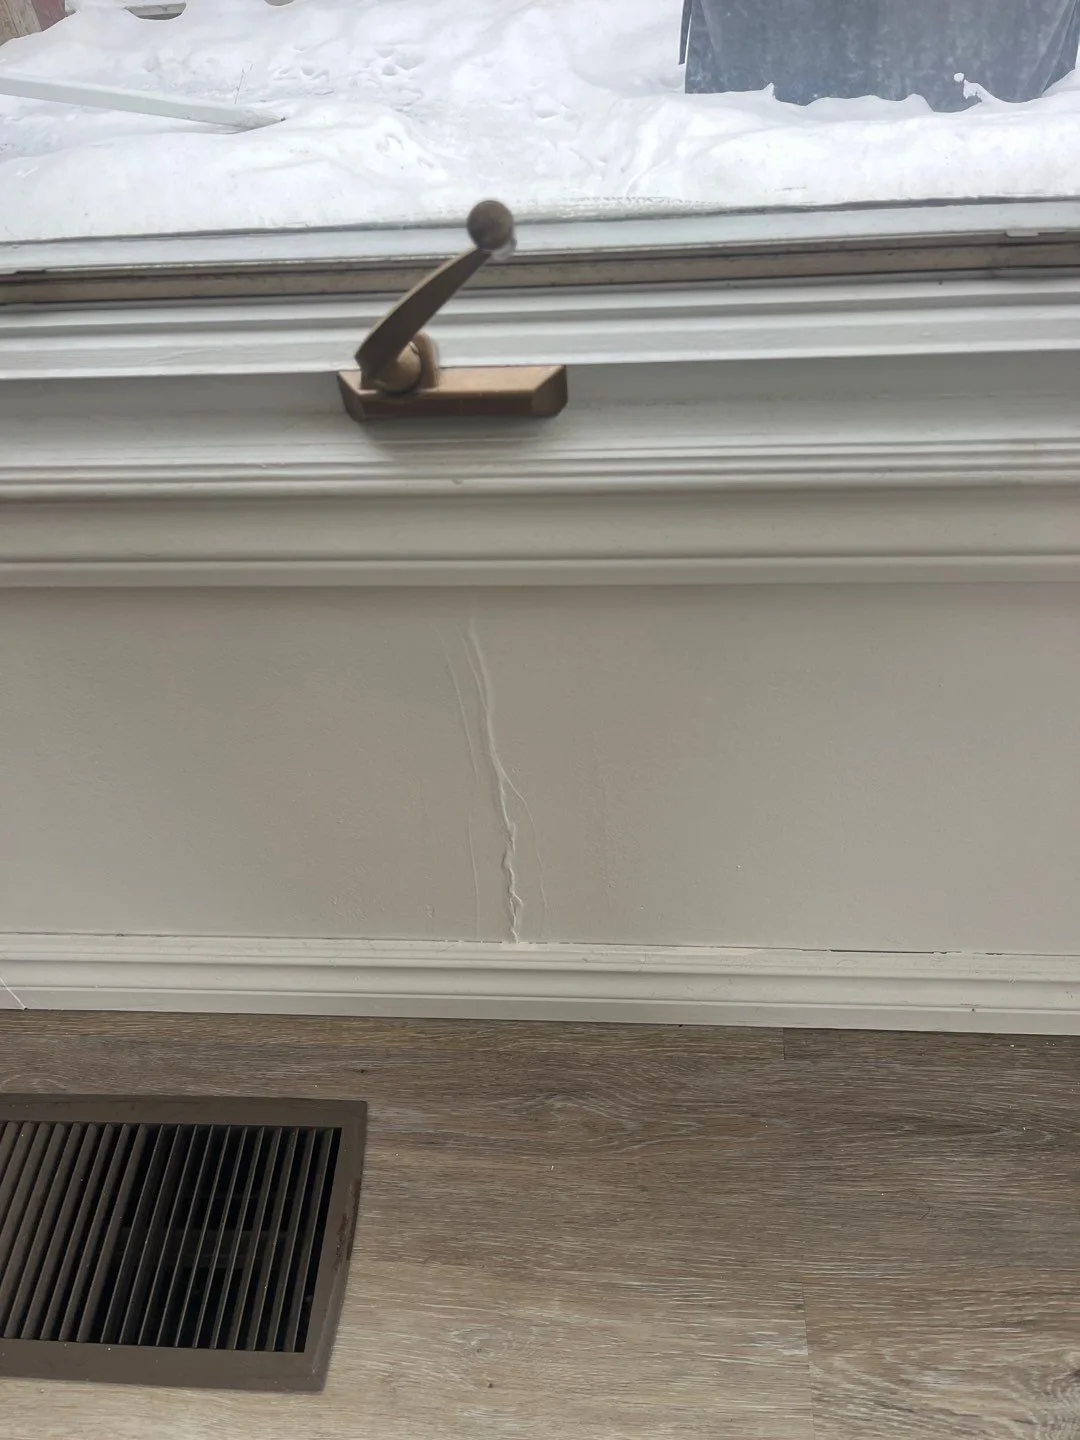
What you should avoid: An installer who takes one quick measurement and rushes out. We've seen this lead to windows that are 1/4 inch off—not enough to be obviously visible, but enough to cause binding, gaps in the frame, or improper weatherproofing.
The Site Survey
Before installation, a professional examines:
- The rough opening: Is it square? Level? Plumb? Most openings aren't perfectly square, and the installer needs to know this.
- Structural integrity: Is there rot around the frame? Water damage? Structural settling? These issues compound if not addressed before the new window goes in.
- Existing condition: What kind of exterior siding? Is there damaged caulk that needs replacement? Are there flashing issues around the existing window?
- Interior considerations: Where is the furniture? Will the opening need protective barriers? Are there obstacles that affect workflow?
- Weather and scheduling: In Calgary, this is critical. Is a chinook forecasted? Are we heading into a cold snap? Wind conditions matter for certain installations.
Product Confirmation
Before the crew arrives, the installer confirms with you and their supplier:
- Correct window model and size
- Right swing direction (left-hand vs. right-hand casement, for example)
- Correct finish and color match
- Hardware options (locks, handles, grilles if applicable)
- Any custom specifications
This sounds basic, but wrong windows showing up is still one of the most common problems we see. A professional double-checks.
Customer Communication
A quality installer walks you through the entire process. You'll learn:
- Exactly how long installation will take (usually 2-4 hours per window)
- What to expect: noise, dust, disruption to your home
- Where the crew will access (don't assume they can access the exterior easily)
- What furniture should be moved
- Whether they'll close or leave the opening exposed (important for weather)
- Timeline: same day completion? Multi-day project?
- Cleanup expectations
Removal: How the Old Window Comes Out
Removal is methodical, not demolition. A professional doesn't just rip things out.
The Removal Process
- Interior trim removal: If you want to keep the existing casing, it comes off carefully. Installers score caulk and use flat pry bars, working slowly to avoid damage. If the trim is staying but needs paint, they protect it.
- Caulk and seal cutting: The installer cuts through old caulk with a utility knife, breaking the seal between window frame and sill. This isn't quick—it's deliberate work.
- Sash removal first: For double-hung windows, sashes come out before the frame. The installer removes any stops, tilts out the sashes, and sets them aside.
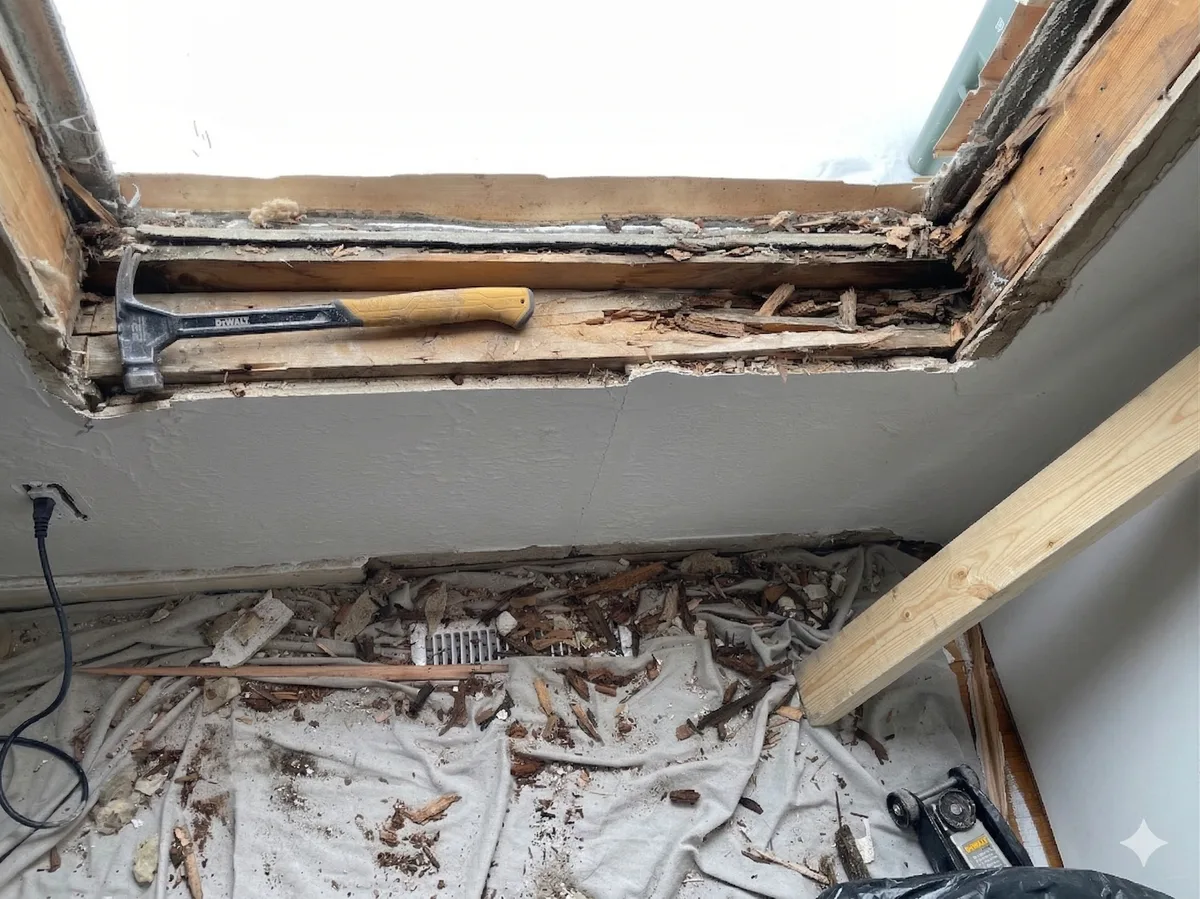
- Frame removal: Once the sash is out, the frame comes next—again, carefully. Installers fasten windows from the outside, so removal means cutting fasteners and prying the frame straight out.
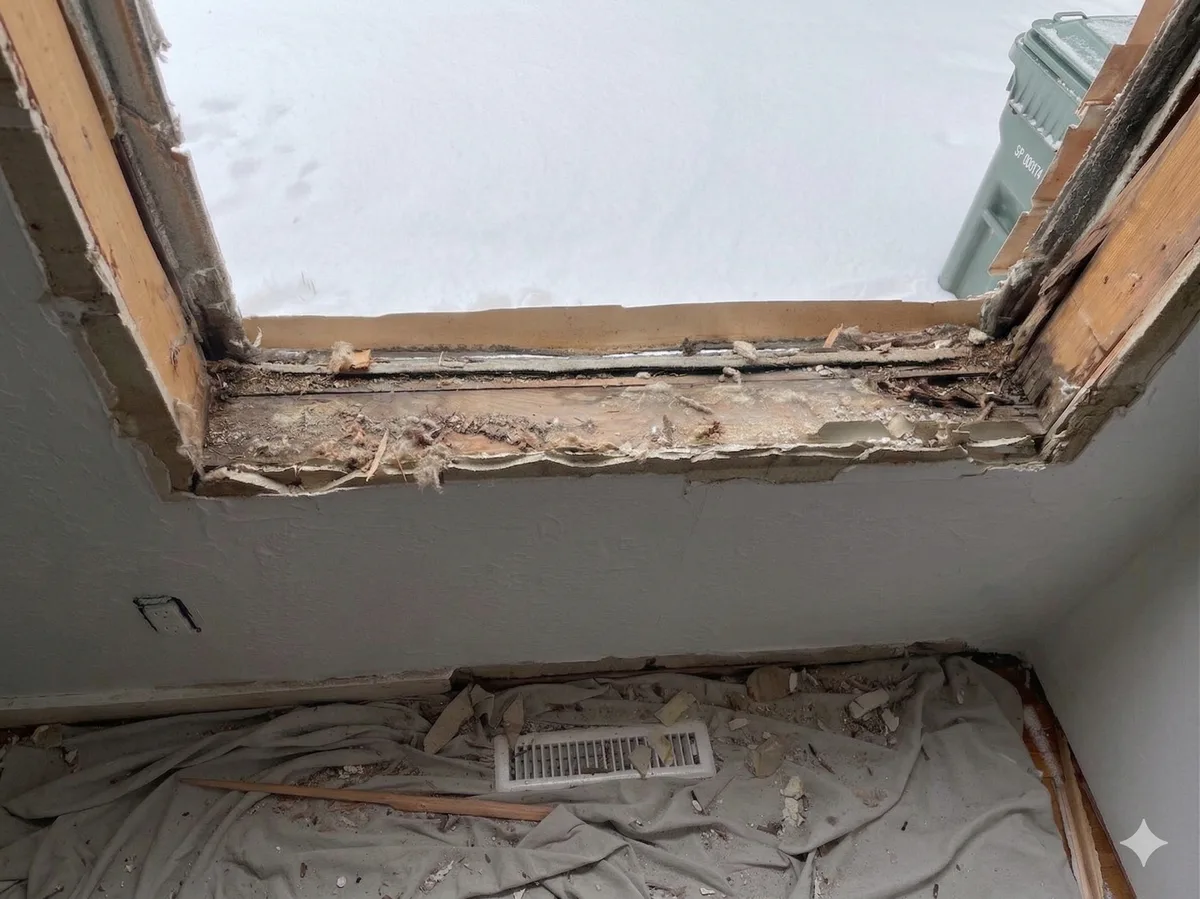
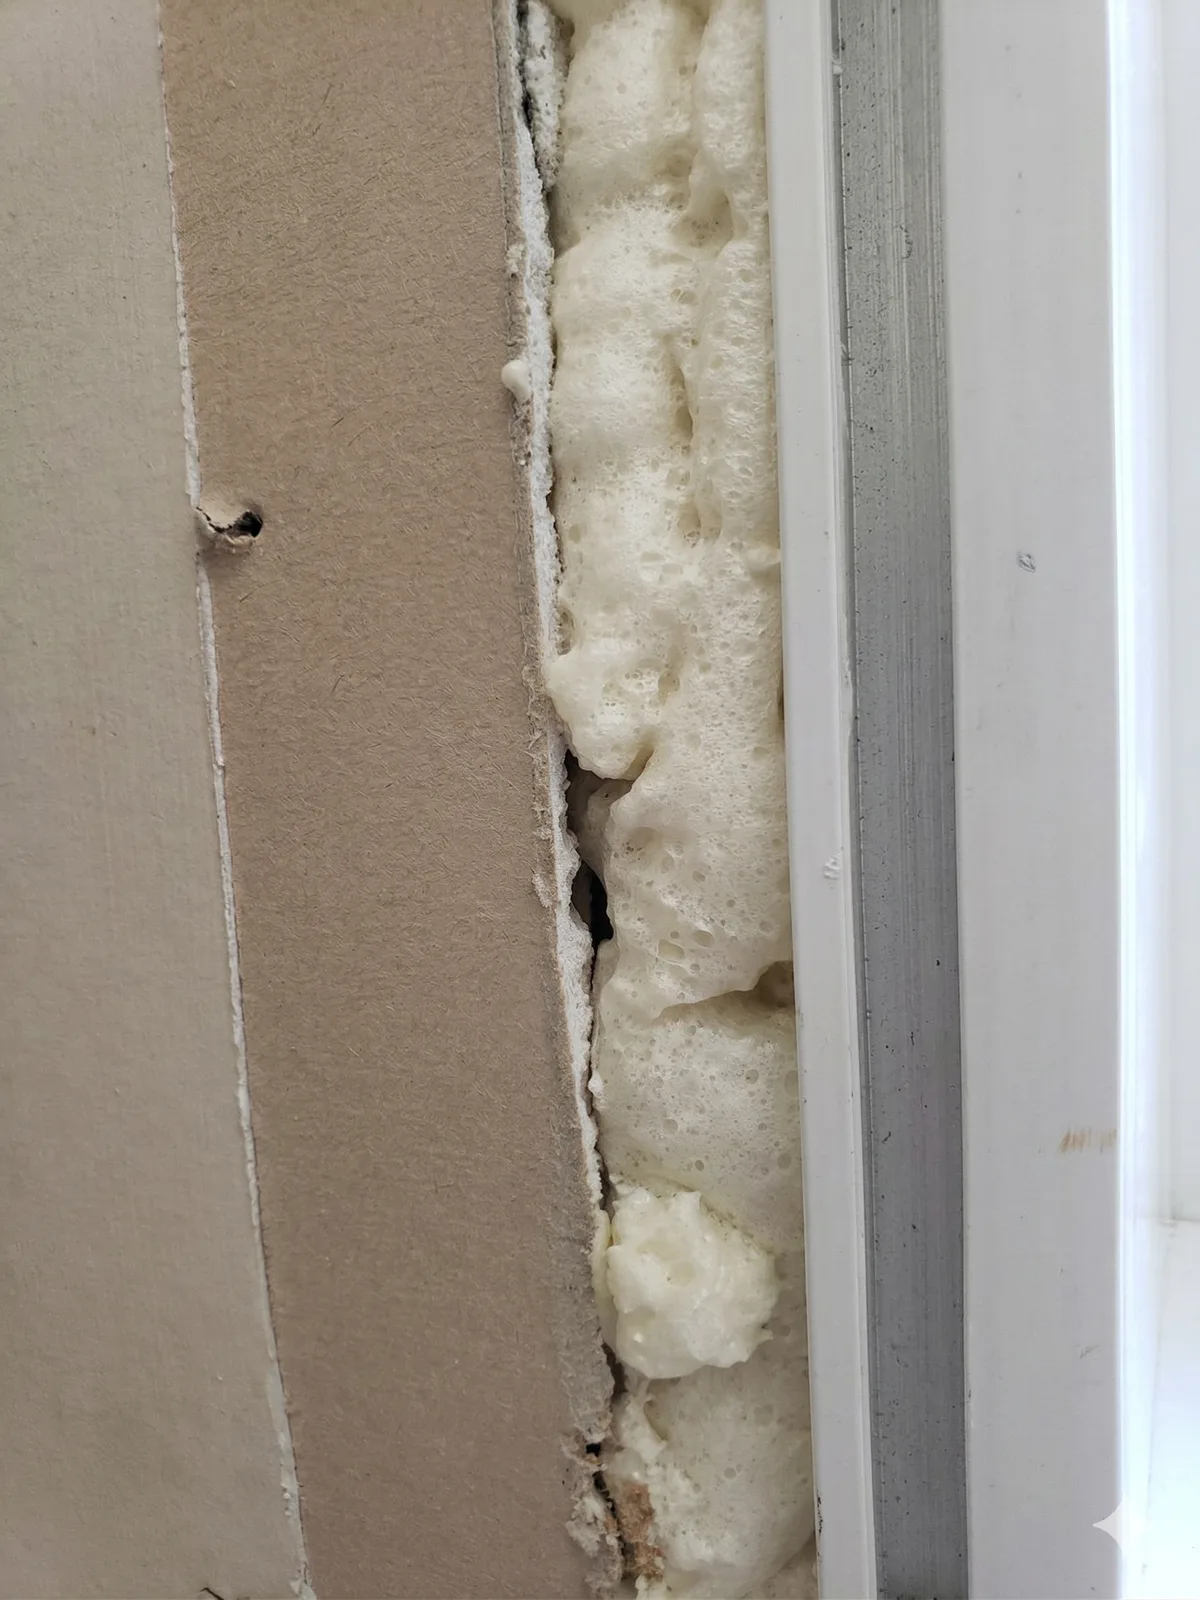
- Rough opening inspection: Now the real work becomes visible. The installer examines the opening for rot, water damage, insulation gaps, and structural issues. This is where surprises happen—and why it's critical to have a professional doing the work who can identify problems.
- Cleaning: The opening is swept clean. Any debris, old foam, deteriorated material—all removed.
This entire process usually takes 30 minutes to an hour per window, depending on how the original window was installed and the condition of the opening. If an installer rushes through it, you're already looking at a problem installation.
The Rough Opening: Where Good Installers Earn Their Reputation
This is the section that most homeowners never see—the opening itself, before the new window goes in. And it's where quality separates from shortcuts more clearly than anywhere else in the process.
Assessment and Correction
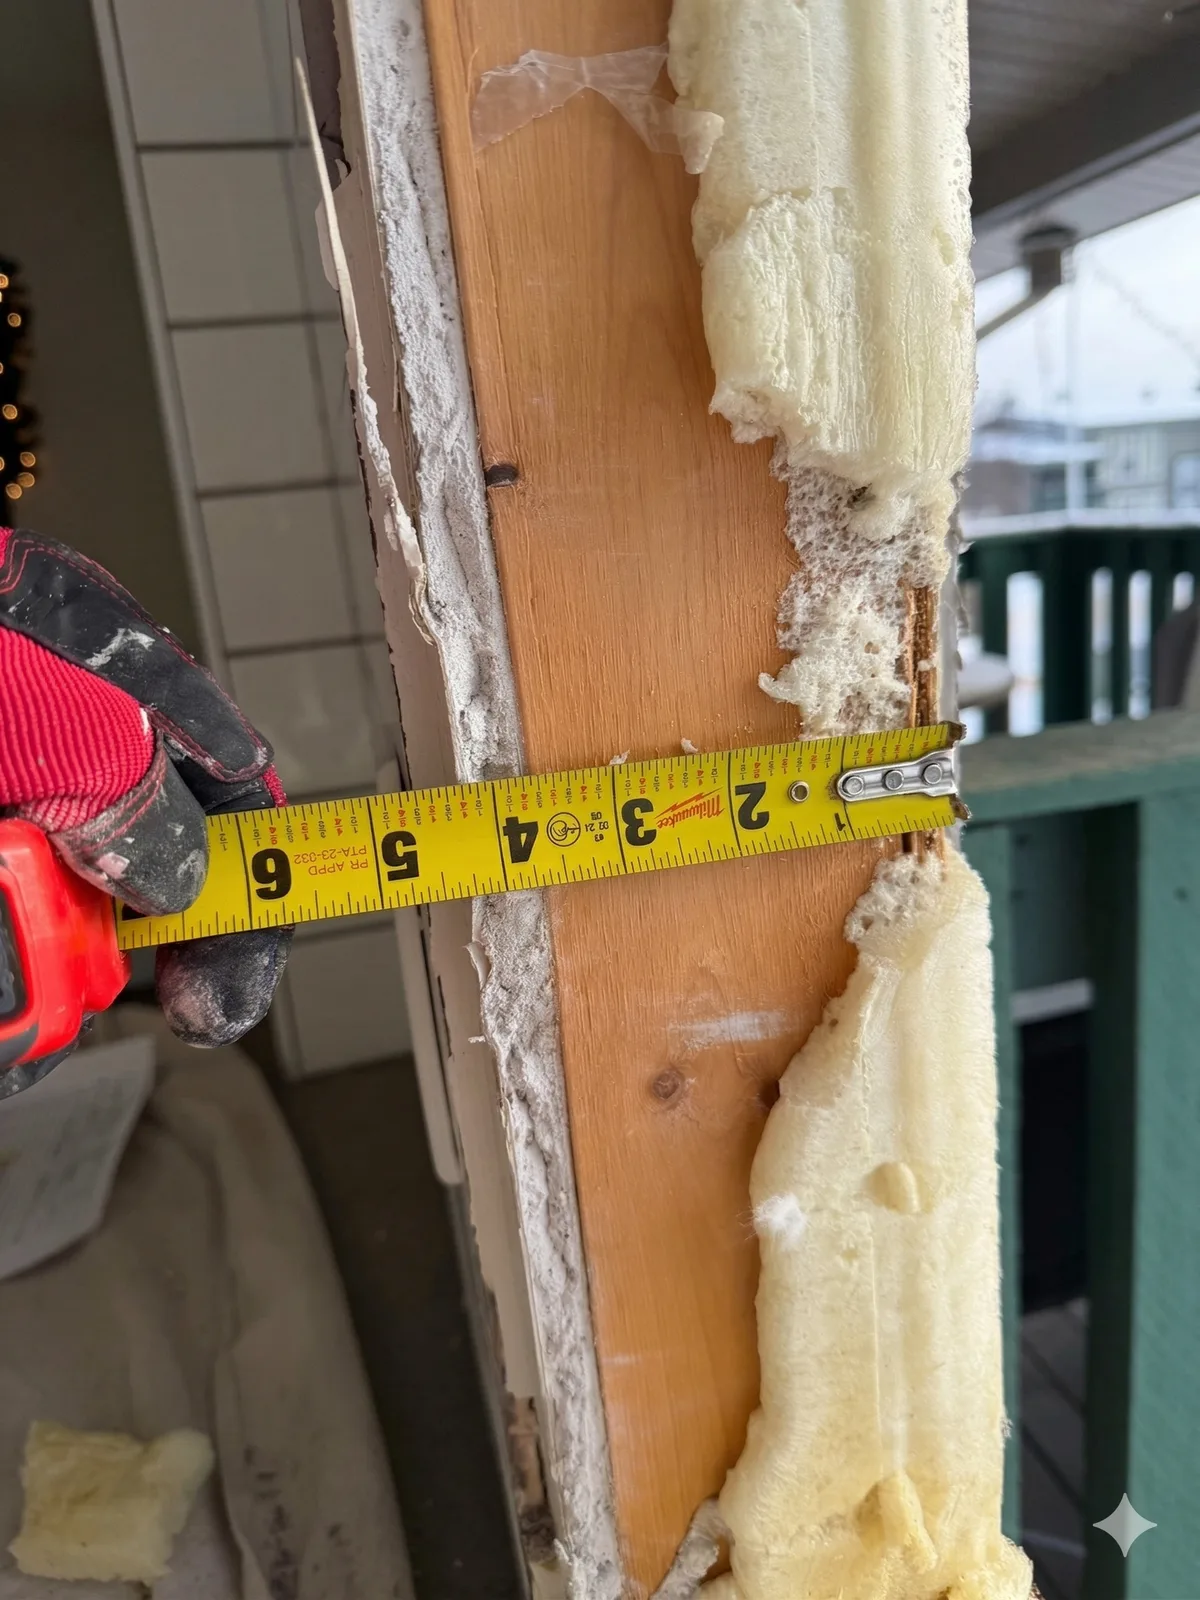
A professional uses a level to check if the opening is truly level and plumb. Most openings aren't perfectly square—houses settle, settle unevenly, and age. The installer measures diagonals to check for squareness. If the opening is out of plumb by more than 1/4 inch, decisions need to be made about shimming or other adjustments.
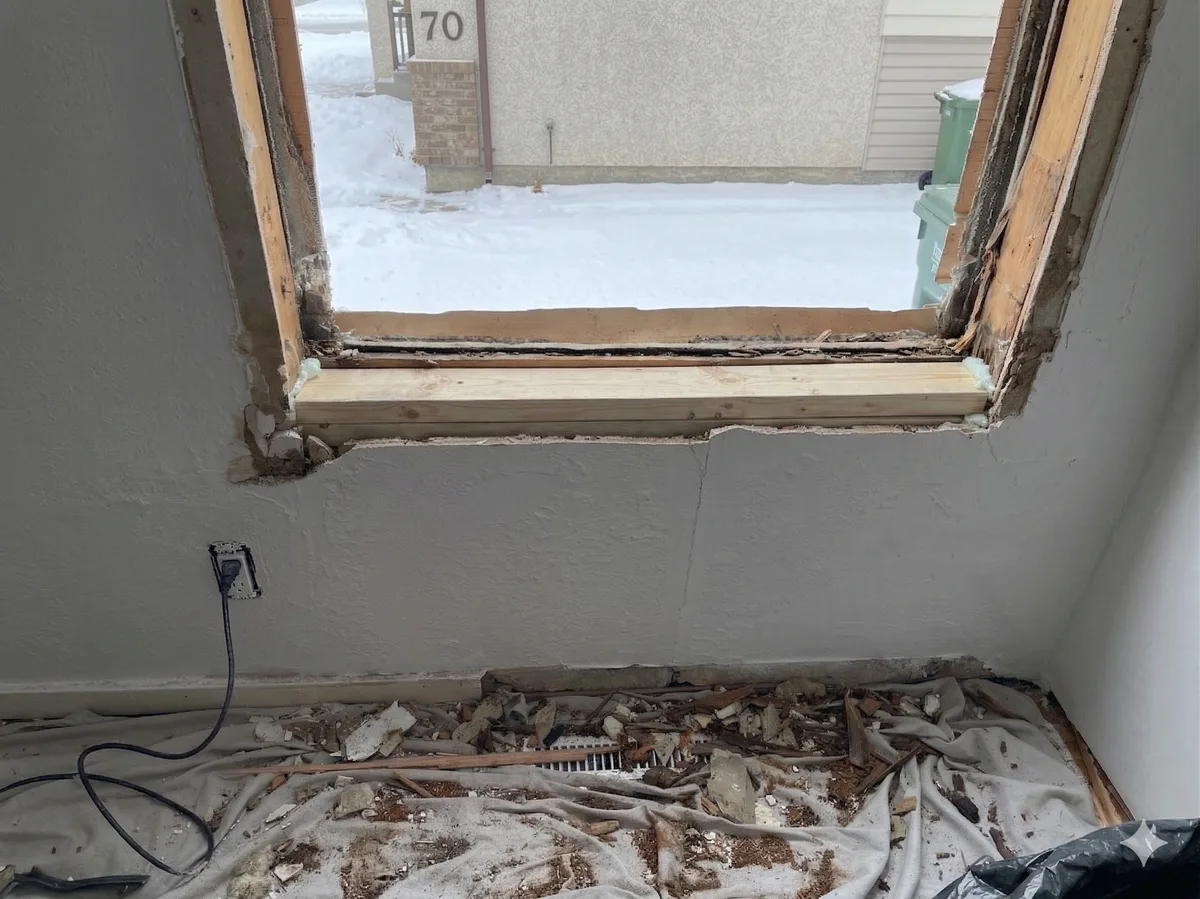
If rot is found, it gets treated properly. Not covered up, not just left alone, but treated with wood preservative or replaced entirely. This is expensive, but it's the right solution. A professional never hides structural damage under a new window frame.

Flashing and Waterproofing
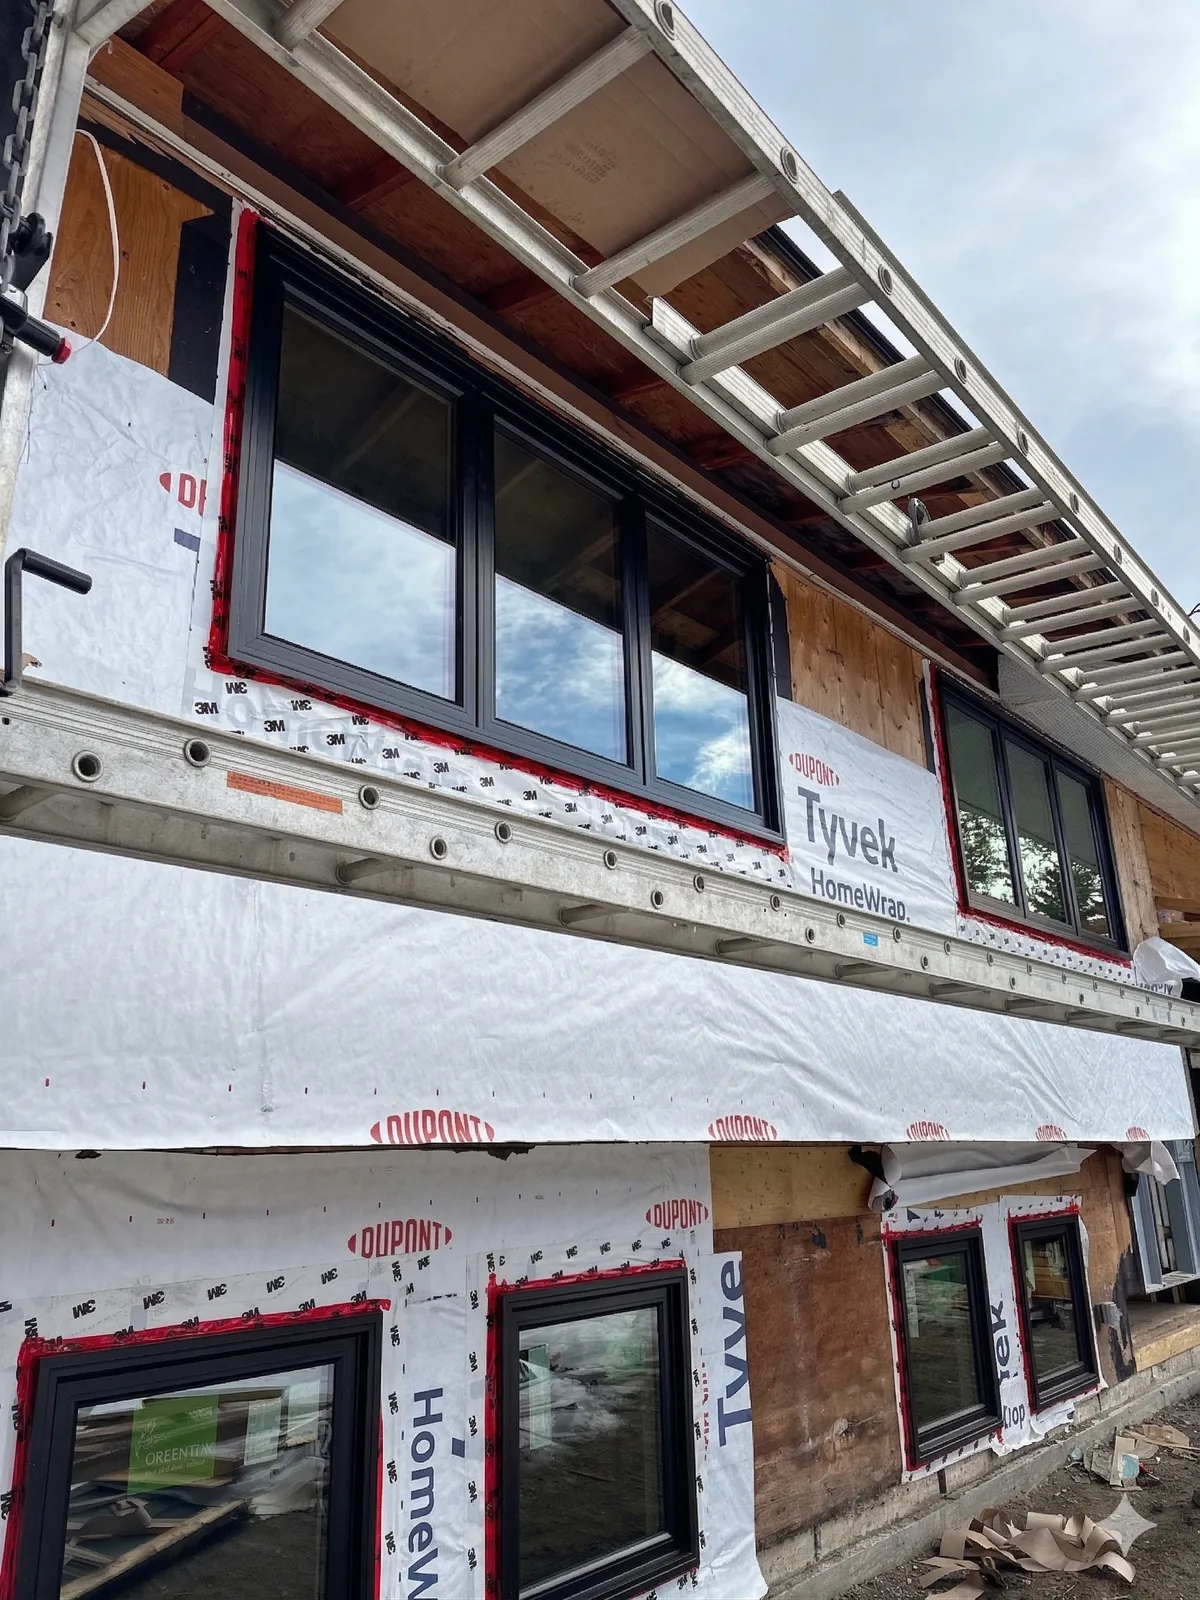
This is the critical step that protects your home for years. The installer applies:
- Sill pan or sloped sill: This is the most important piece. If water gets in (and it will get in during heavy rains or ice dam situations), it needs somewhere to go. A properly installed sill pan slopes away from the interior and directs water to the exterior. Without this, water drains into your wall cavity.
- Waterproofing membrane: A professional applies a self-adhering membrane around the opening, especially at corners where water loves to accumulate.
- Flashing tape: Where the membrane meets the exterior, flashing tape creates a complete seal.
Why does this matter? Because Calgary's climate is harsh. We get freeze-thaw cycles, sudden temperature swings, chinooks that melt snow rapidly, and aggressive UV exposure. Waterproofing failures don't show up until years later—when you have water stains, rot, or structural damage. By then, the fix is expensive.
- Opening is level, plumb, and square (within 1/4 inch)
- All rot treated or replaced
- Insulation removed from opening perimeter (1-2 inches all around)
- Sill pan installed with proper slope
- Waterproofing membrane applied completely
- No debris or deteriorated material in the opening
- Exterior surface prepped and clean
Window Installation: The Main Event
Finally, the new window arrives. This is what most homeowners think of as "installation," but as you can see, it's actually the halfway point. Done right, it takes focus and precision.
Dry-Fit First
A professional dry-fits the window—places it in the opening without fasteners—to verify it fits, operates smoothly, and is square in the opening. This takes five minutes and prevents major problems later.
Shimming and Leveling
Windows are shimmed and secured every 12-16 inches around the perimeter using proper shims. Here's what matters:
- Material choice: For vinyl windows, use plastic or composite shims, not cedar wood shims. Cedar can transfer moisture and cause issues.
- Spacing: Shims go at top, bottom, and sides—at multiple points. Fewer shims means more load on fasteners and potential frame distortion.
- Leveling: The window must be level side-to-side and plumb front-to-back. A professional uses a level to verify before securing anything.
- Operation test: Before fastening, the window opens and closes smoothly. If it binds, something's wrong with the installation—it gets corrected now.
Fastening
Once everything is shimmed and verified, the window fastens using the correct fasteners (usually #8 or #10 fasteners into the nailing fin or frame) at the right depth. Over-torquing fasteners is common—and it's a mistake. Over-tightened fasteners warp vinyl frames, compromise the seal, and can even crack the glass.
A professional doesn't over-torque. They fasten snug, not cranked down hard.
Thermal Expansion Allowance (Calgary-Specific)
This is critical in Calgary's climate. Vinyl expands and contracts significantly with temperature changes. A professional leaves 1/4 inch clearance between the window frame and the rough opening to allow for this movement. Without this gap, your window can become stuck, misaligned, or damaged as temperatures swing.
The Seal: Where Energy Efficiency Lives or Dies
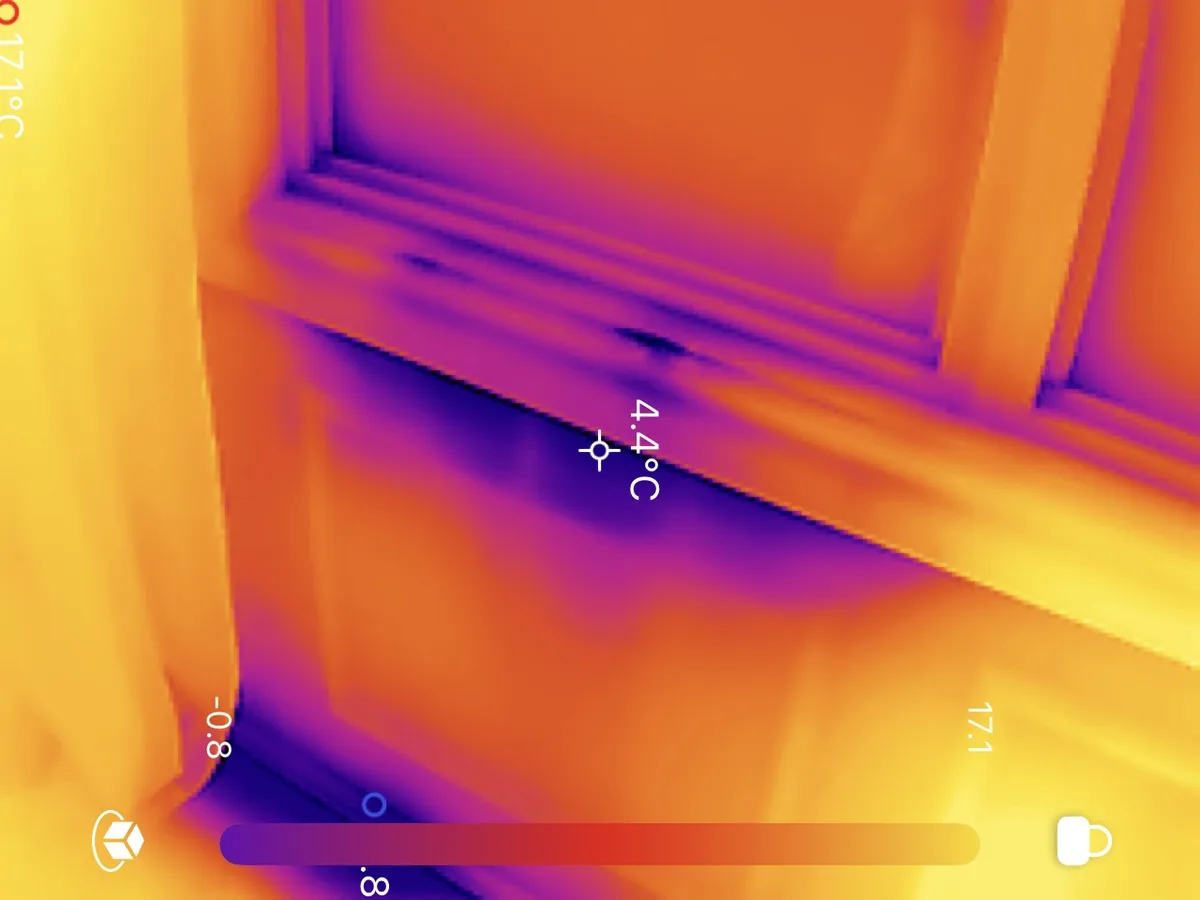
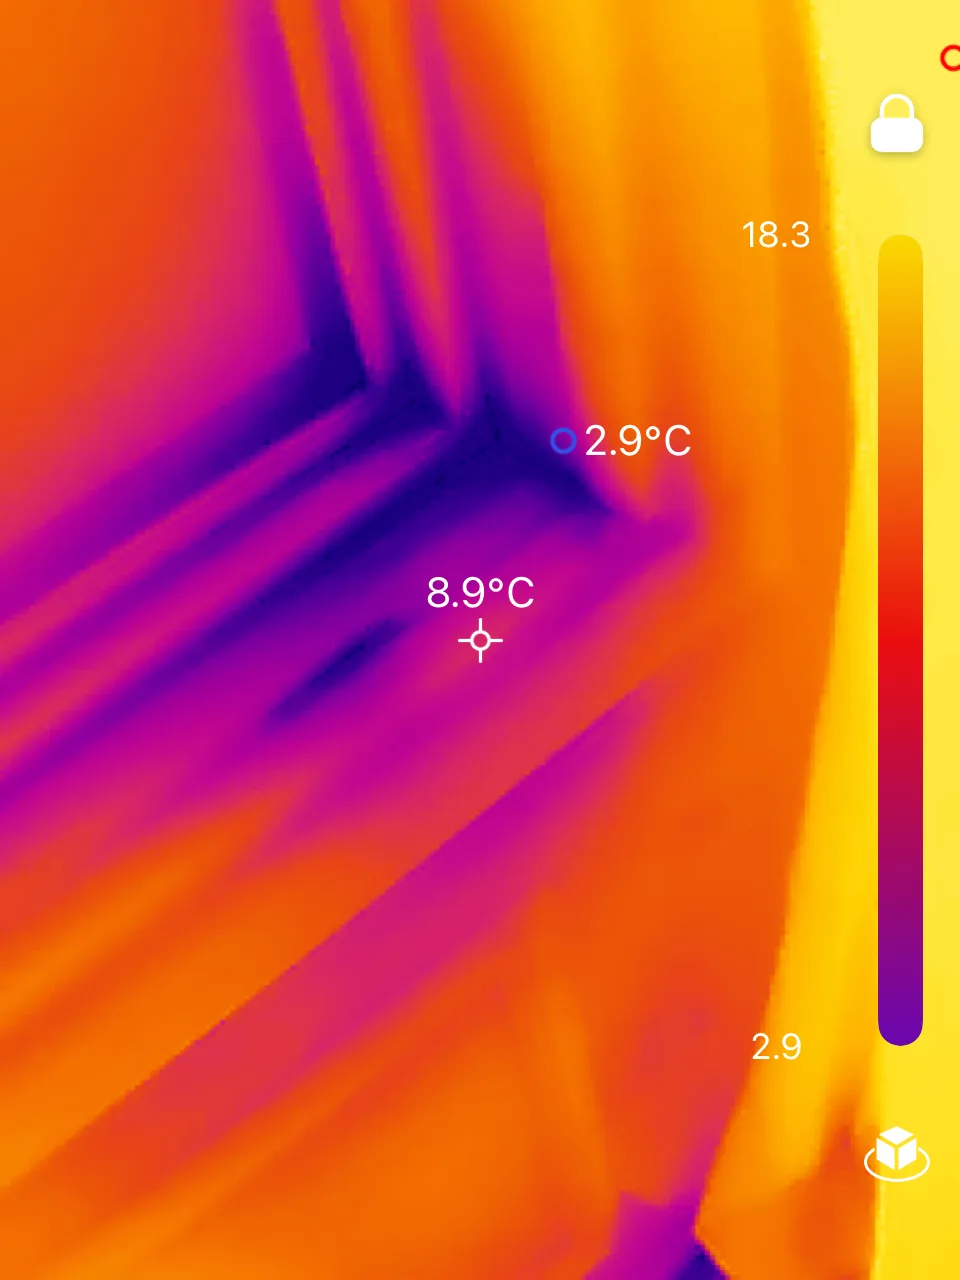
The gap between the window frame and the house structure is where energy efficiency lives. This is where most installations fail.
Why This Matters Even More in Calgary
Calgary sits in a Chinook zone, which means rapid, extreme temperature swings. It's not uncommon to have -20°C outside while the inside of your home is +20°C — a 40-degree differential across the thickness of your wall. That kind of thermal stress demands highly flexible, durable sealing materials that maintain expansion and contraction through every cycle.
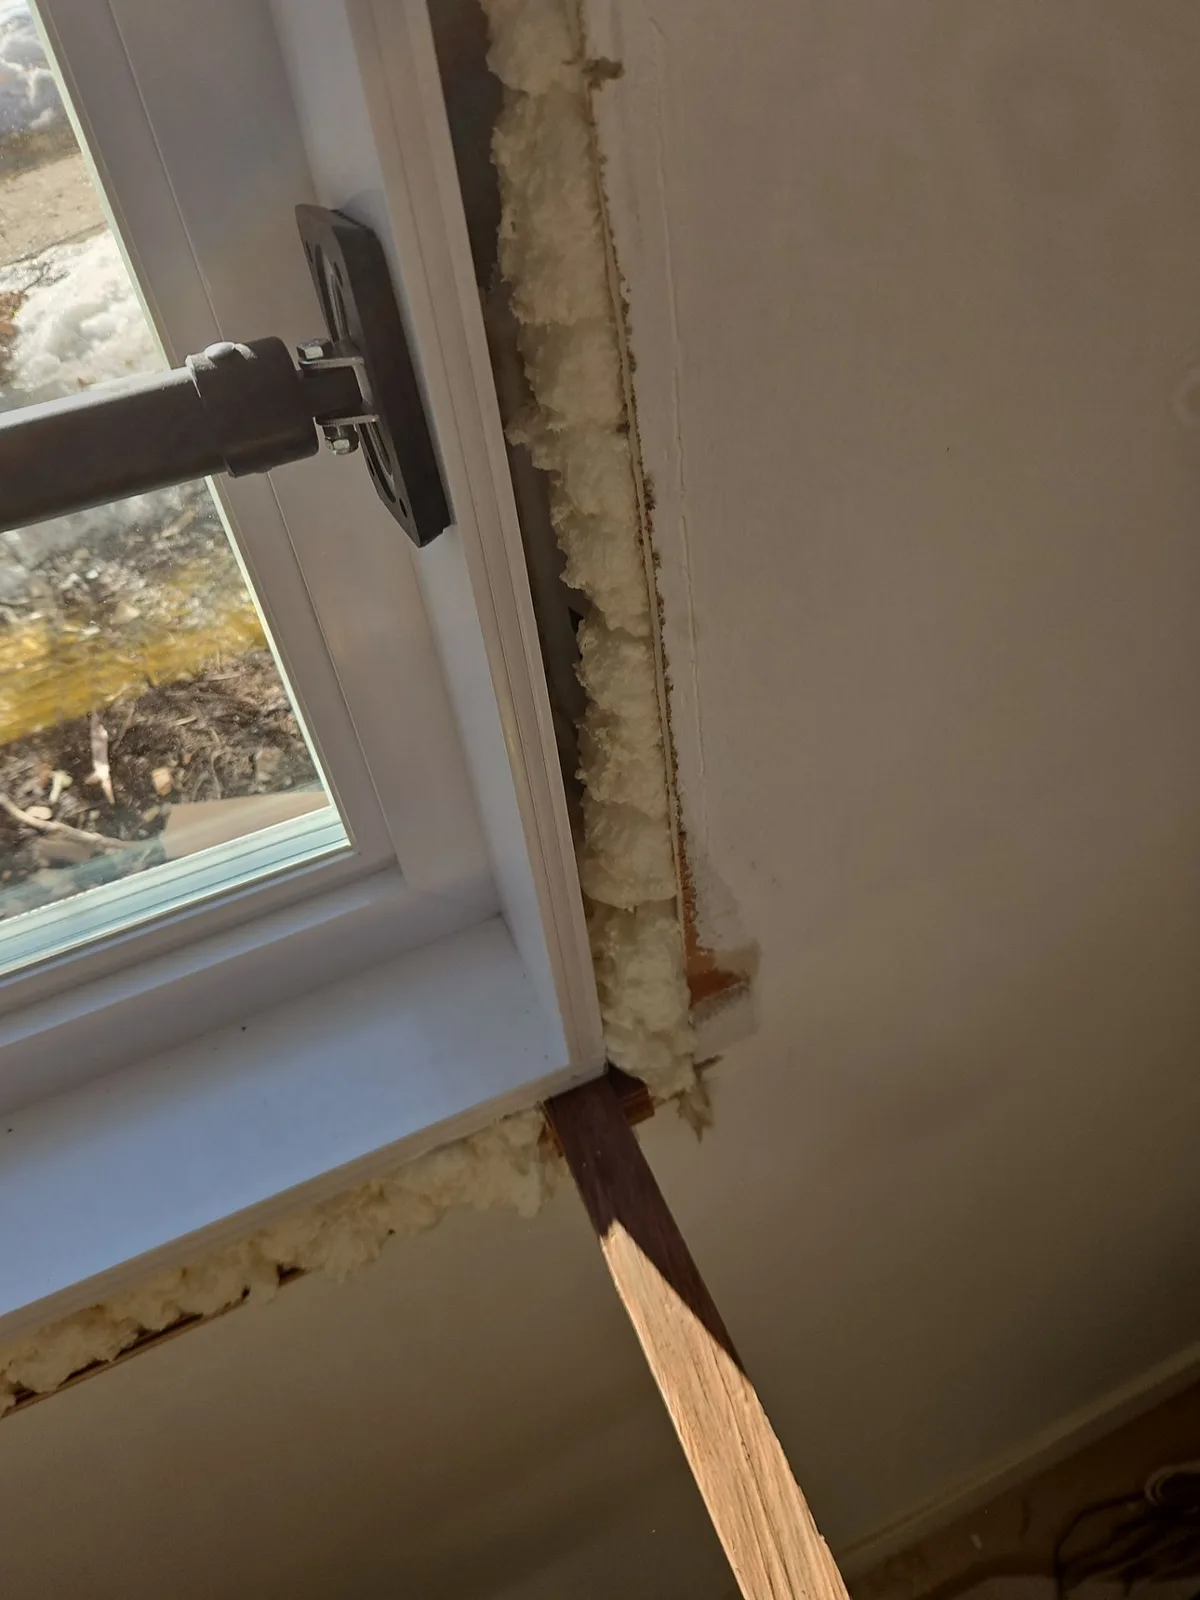
If an installer uses cheap high-expansion foam or incorrect shims, here's what happens: the foam cracks, bubbles, or gets punctured as the house shifts with the temperature. Sometimes shims poke holes straight through the foam during cold-weather installation, when the foam is brittle. Once that seal is broken, cold from outside penetrates the wall cavity. At -20°C outside, the temperature inside your wall might be -7°C on the outer side and +4°C on the inner side. That temperature difference creates condensation — not on your window where you can see it and wipe it off, but inside the wall where you can't.
That hidden moisture drips down into your fiberglass insulation, which starts to lose its thermal properties. Wet insulation begins conducting cold instead of blocking it, which creates even more condensation, spreading further. Over time, this rots the jack studs and framing, and grows mold inside the wall cavity. By the time you notice a problem — a musty smell, a cold spot, peeling paint — the damage is extensive and the repair is expensive. All because of a compromised foam seal that nobody checked.
The Proper Sealing Method
A professional uses what's called the "foam method":
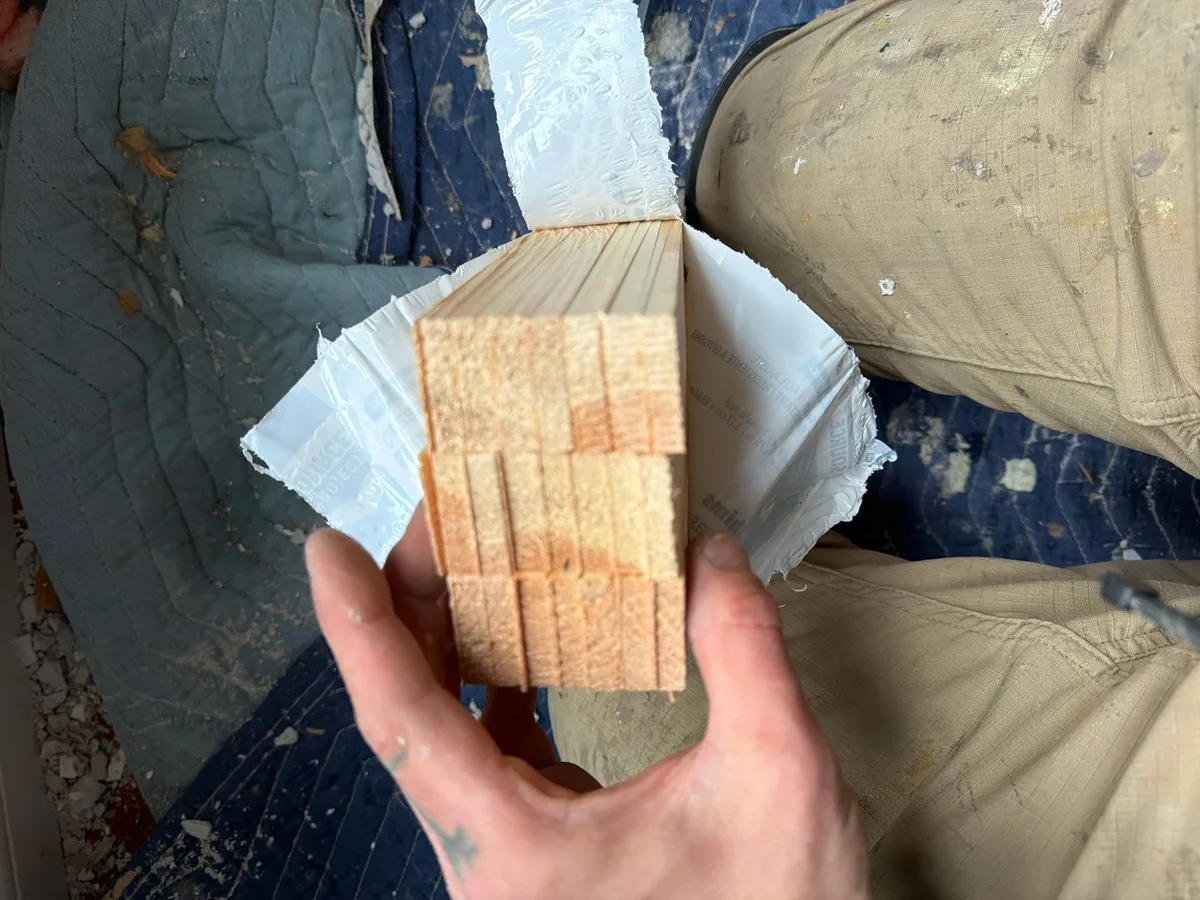
- Backer rod: A foam or rope material is pressed into the gap first, creating a backing for the sealant and ensuring the proper width. For most residential windows, the gap should be 1/2 inch to 3/4 inch.
- Low-expansion spray foam: Never, ever use high-expansion foam in a window opening. It expands with force and can distort the frame. Low-expansion foam is used instead, applied conservatively. It fills most of the gap but leaves room for the final sealant layer.
- Vapor barrier continuity: On the interior, the installer ensures the air barrier continues across the window—using acoustical sealant or specialized tape. This prevents air leakage into your walls.
- Exterior waterproofing: On the exterior, membrane and flashing tape seal the joint completely, with proper lapping (each layer overlaps the one below to shed water).
- Final sealant: Caulk goes over the foam and backer rod, inside and out. The sealant should be smooth, continuous, and tooled properly (not excessively, not too thin).
Caulk Selection and Application
Not all caulk is equal. Cheap acrylic caulk fails in Calgary—UV degradation, temperature cycling, and our dry climate cause it to crack and separate in just a few years. A professional uses:
- Exterior: Polyurethane or silicone caulk that's rated for exterior use and UV resistance. Applied as a continuous bead, tooled smoothly.
- Interior: Quality latex-acrylic or acrylic-silicone caulk. Again, continuous and tooled.
The application matters too. A single, continuous bead of properly-tooled caulk is far better than multiple applications or thick globby caulk meant to hide gaps.
Finishing: The Details That Show Quality
You're nearly done. Now come the finishing touches that show whether an installer takes pride in their work.
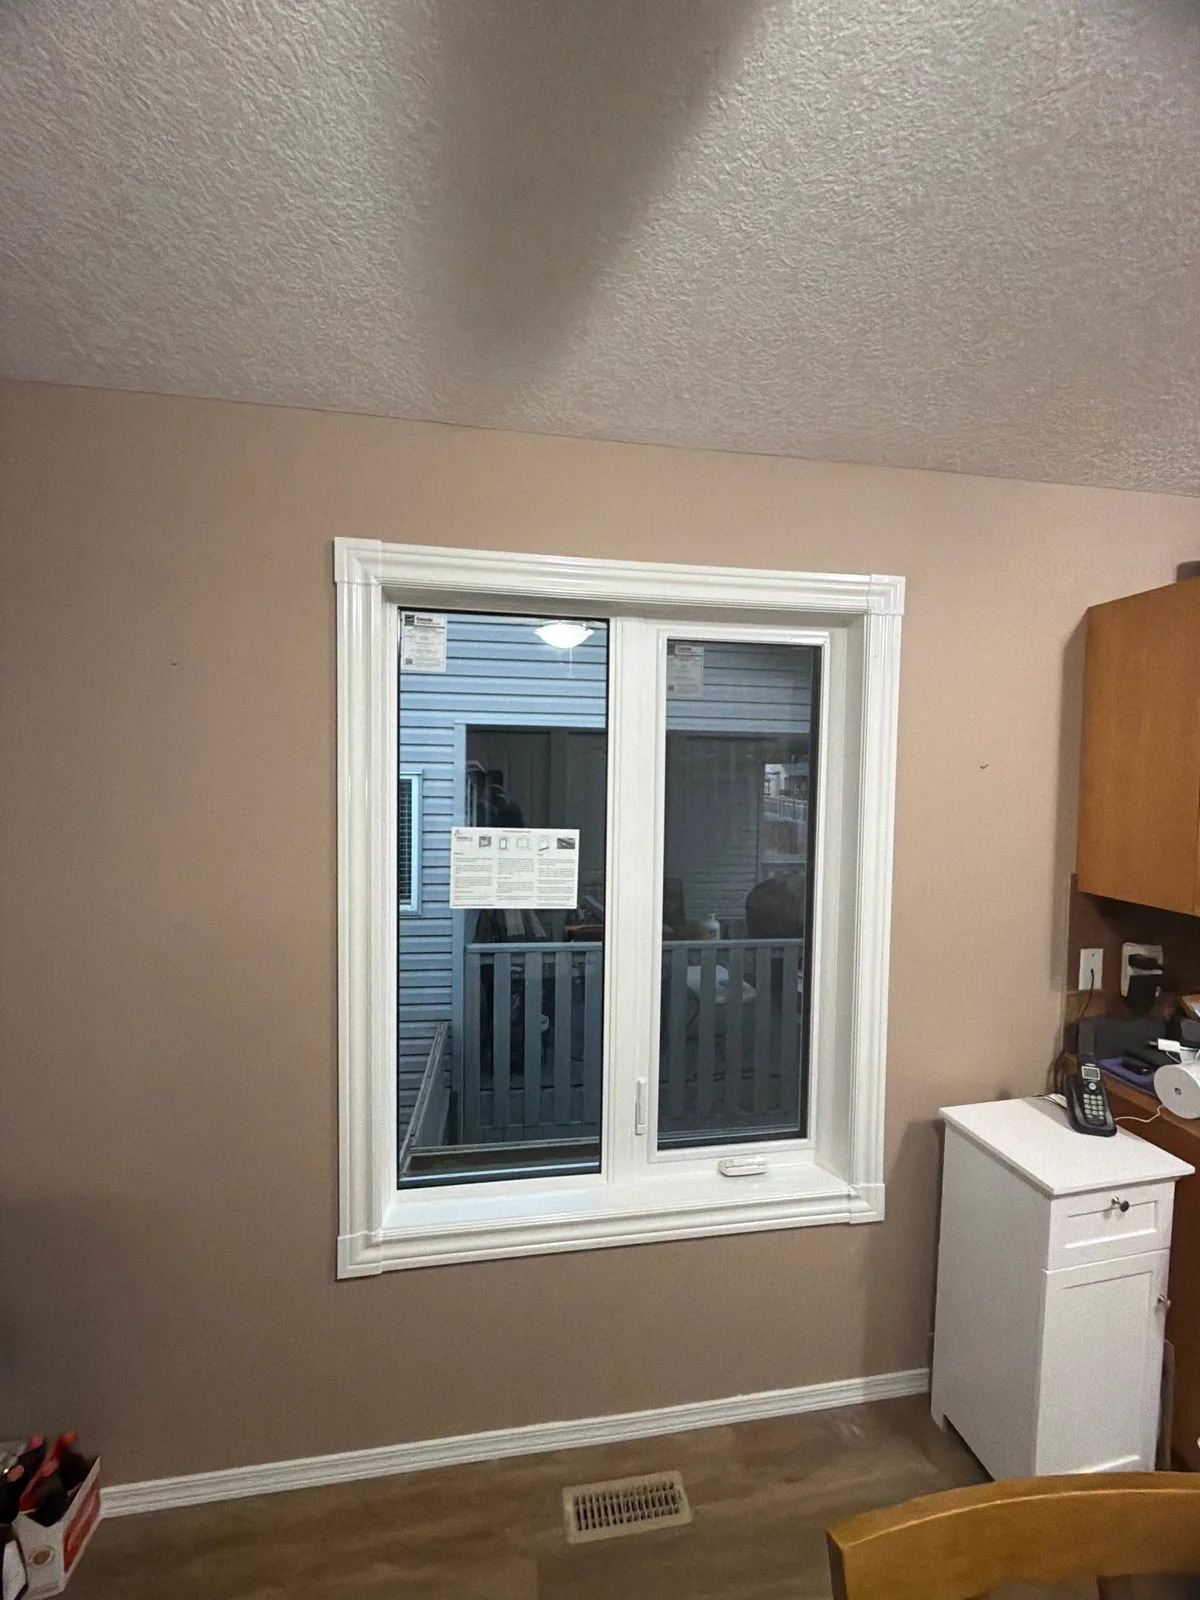
Interior Trim (Casing)
If new trim is installed (or the old trim is reinstalled), a professional ensures:
- Tight joints at corners—no visible gaps
- Trim sits flush against the wall and window frame
- Proper nail spacing (16 inches apart is standard) to prevent nail popping
- Nail holes properly filled and sanded if the trim will be painted
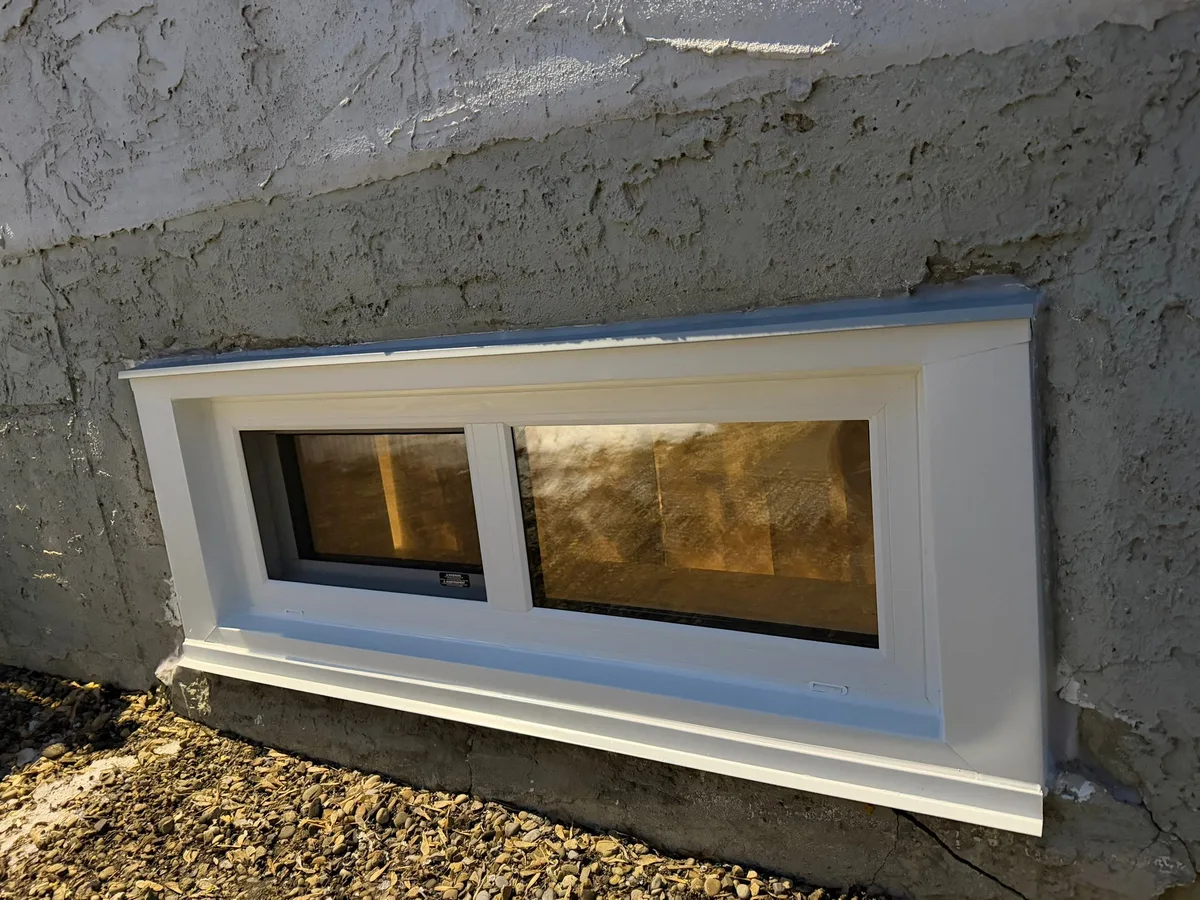
Exterior Finishing
Exterior details vary by siding type, but a professional ensures:
- If aluminum capping or trim is used, it's properly fastened and sealed
- Flashing is properly integrated with the siding
- The transition is sealed and waterproof
- Caulking is smooth and continuous
Cleanup and Final Walkthrough
This is where many installations show their true colors. Quality installers:
- Remove all protective film from the glass and frame
- Clean the glass thoroughly
- Remove all foam scraps, staples, and packaging from your home
- Sweep and vacuum the work area
- Walk through the job with you, explaining what was done, demonstrating window operation, and answering questions
- Provide warranty documentation, care instructions, and contact information for future service
If the cleanup is sloppy, the installer doesn't explain the work, or there's no warranty documentation—these are signs the installation may not be professional-grade.
How to Protect Your Investment
Since you can't be expected to become an expert window inspector overnight, here are the concrete steps you can take to make sure you get quality work.
Understand the Difference Between Opinion and Fact
When a company says "we're professionals" or "we have the best installers" — that's their opinion. Every company says that. To convert an opinion into a fact, you need a checkpoint: independent verification from someone who has no financial interest in telling you what you want to hear. The question isn't "do they say they're good?" The question is "can they prove it?"
Look for Independent Certification

The strongest checkpoint available is a Window Wise certification from the Siding and Window Dealers Association of Canada (SAWDAC). This isn't a self-awarded badge — it means the company follows strict, independently verified installation standards and is subject to random third-party inspections. A Window Wise inspector regularly checks whether the company actually follows its own rules. If the inspector finds they don't, the certificate gets revoked — the company can no longer claim to meet the standard. Window Wise also provides an additional 5-year warranty on the installation, giving you an extra layer of protection beyond the manufacturer's warranty.
Demand Photographic Documentation
A reputable installer should take photos before, during, and after the process — and not just wide shots from a distance. You want close-up photos of the important and sensitive areas: the rough opening before the new window goes in, the blue skin (waterproofing membrane) applied around each opening, the foam application, and the finished seal. These photos serve two purposes: they confirm the work was done properly, and they protect you if a dispute arises later. If there's a dented wall, a scratched floor, or siding damage after installation, comparing before and after photos makes it clear who is responsible.
Expect Professional Site Treatment
Quality installers treat your home like their own. That means drop sheets on floors and furniture, protective booties indoors, careful handling around finished surfaces, and a thorough cleanup when they leave. If the crew shows up without protective materials, that tells you something about their standards.
Ask About Materials
Specifically ask what foam they use. You want low-expansion foam designed for windows and doors — not the cheap high-expansion variety from a hardware store. In Calgary's climate, the foam needs to stay flexible through extreme temperature cycles. The wrong foam cracks within a year or two, and you won't know until you start feeling drafts or seeing condensation.
Hold Back Final Payment
The sales process can sound very sweet. Sales professionals are good at building trust — that's their job. But the reality of your project arrives with the installer, not the salesperson. Even if you're 100% confident everything will go smoothly, there are countless situations where the final result ends up different from what you expected.
Before the project starts, write down your expectations: what you expect the finished product to look like, how the site should be left, what timeline was promised. Then withhold a portion of the final payment until the installation is complete, the cleanup is done, and you've personally compared the result against those written expectations. A good project is one that matches what you were told. If it doesn't match, holding back fair money gives you leverage to get it fixed — and any legitimate installer will understand and respect this practice.
- Verify Window Wise / SAWDAC certification before signing
- Request photos of every rough opening before the new window goes in
- Confirm they use low-expansion foam rated for windows
- Check that the crew uses drop sheets and protective booties
- Hold back 10-15% of payment until final walkthrough is complete
Red Flags: Signs of Poor Installation
Here's a checklist to inspect after installation or during the process. If you see multiple issues, you may want to ask the installer to correct the work.
Frequently Asked Questions
Most residential window installations take 2-4 hours per window when working alone. Multiple windows or complex situations may take longer. If your installer is rushing through the work (less than 2 hours), that's a red flag. They may be skipping crucial steps like proper measurement, waterproofing, or testing operation. Conversely, if a simple single window takes 6+ hours, it may indicate inefficiency or problems being discovered and fixed. Reasonable timeframes for installation are:
- Single window, single story: 2-3 hours
- Multiple windows (3-5): 6-10 hours with a crew
- Complex situations (high elevation, difficult access): May require additional time
Yes. While not required, being home allows you to:
- Answer questions about preferences or access
- Observe the work and ensure it's being done to your expectations
- Immediately spot issues that need correction
- Participate in the final walkthrough and verify the work
- Ensure access to the home (sometimes crews need interior access)
At minimum, plan to be home for the initial assessment and final walkthrough. If you can't be present, ask for detailed photos documenting the work.
This is a serious problem. Flashing and foam are not optional—they're essential to your home's waterproofing and energy efficiency. If your installer proposes skipping these steps, that's a major red flag.
Ask them directly: "Will you be installing a sill pan, waterproofing membrane, and foam sealing in the gaps?" If the answer is anything but a clear yes, get another quote. Quality installation requires proper waterproofing. Full stop.
A professional may explain that some situations use different materials (board insulation instead of foam, for example), but the principle remains: the gap must be sealed, the opening must be waterproofed, and the job must be done properly.
Technically, yes. Practically, we'd advise against it for most homeowners. Window installation requires:
- Proper tools (levels, shims, caulk guns, spray foam equipment)
- Understanding of waterproofing and building science
- Experience with local code requirements
- Physical access (especially exterior work at height)
- Knowledge of common mistakes and how to avoid them
Most window manufacturers void warranties if installation isn't done by a certified professional. If you're confident in your skills and willing to research thoroughly, DIY is possible. But if this is your first time, professional installation is worth the cost.
Late spring (May-June) and early fall (September-October) are ideal. These periods have:
- Stable, moderate temperatures (good for sealants and foam)
- Lower humidity (improves curing)
- Predictable weather (fewer surprises)
- Lower wind speeds (easier exterior work)
Summer is possible but very busy—expect longer waits. Winter installation is possible but challenging due to temperature-sensitive materials and weather unpredictability. Spring is popular but avoid right before chinook season (February-March) when rapid temperature swings can complicate the work.
Have Questions About Installation Quality?
Now that you know what good installation looks like, let's talk about your home. We'll assess your windows, explain the process, and deliver the quality work you deserve.
Ask a QuestionRelated Articles
How to Choose the Right Windows for Calgary
A complete guide to selecting windows that perform in our climate.
Read Article →Triple Pane vs Double Pane: Which Is Right for Calgary?
Compare performance, cost, and ROI for Calgary's extreme climate.
Read Article →Cost Guide 2026
Understand pricing, what affects cost, and how to budget for your project.
Read Article →